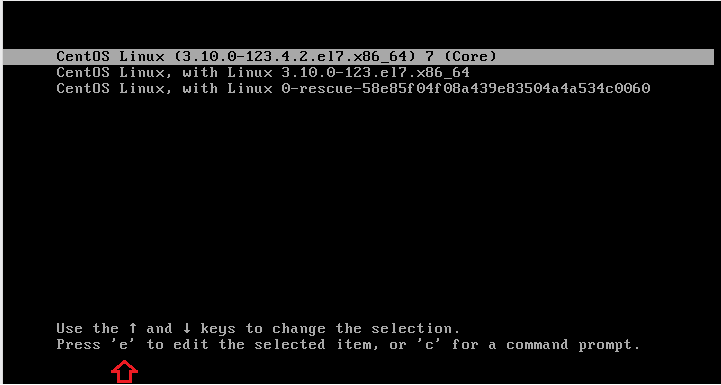
https://www.liberiangeek.net/2014/09/reset-forgotten-root-password-centos-7-servers/
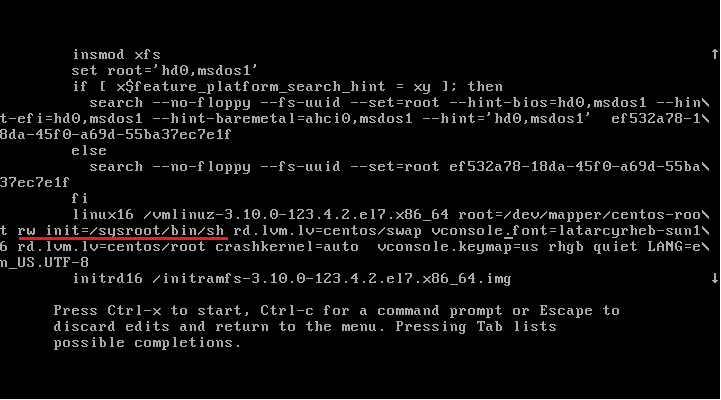
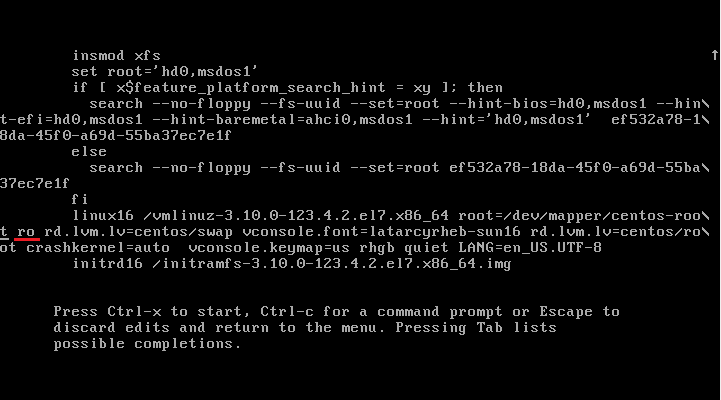
Next, scroll down to the list until you see the line underlined below ( ro ) . What we need to do is change that ro to rw and start into a bash shell. It should look like this rw init=/sysroot/bin/sh.
Change the ro line to rw and add init=/sysroot/bin/sh
After changing that, press Control + X or Ctrl + X on your keyboard to start into single user mode using the bash shell specified above. In this mode, we’re going to change the root password.
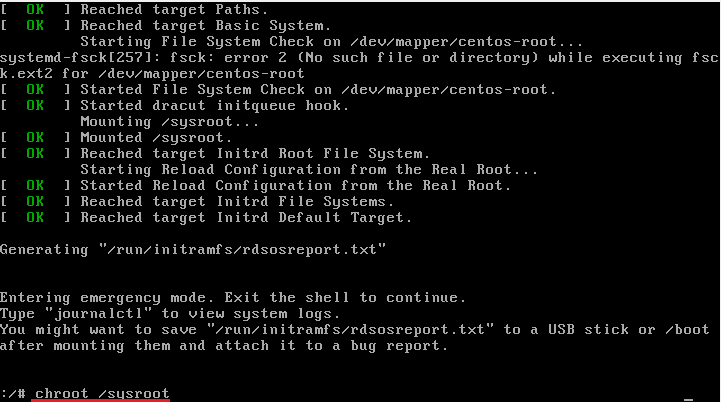
In the single user mode, run the command as shown below
chroot /sysroot
Finally, run the commands below to change the root password.
You’ll be prompted to create and confirm a new password. After creating the password, run the commands below to update SELinux parameters
touch /.autorelabel
Grybų karas
Visokie grybai, kur pasitaiko kiekvieną dieną.
2017 m. kovo 20 d., pirmadienis
2016 m. balandžio 5 d., antradienis
How to Convert Windows XP SP2 to SP3
~ go to start---->Run--> type the word Regedit
~ Your windows Registry Editor will open,
~ Go to HKEY_LOCAL_MACHINE\SYSTEM\ CurrentControlSet\ Control\ Windows
~ Than please modify “CSDVersion” from “0×00000200” (SP2) to the Windows XP SP3 value of “0×00000300” and than reboot your system.
Now your Window has been upgraded to SP3 and you will be able to installed various advance softwares.
This is the easy trick which will bypass the information so that any program or software require SP3 (and if you have only SP2) would exactly work.
2015 m. lapkričio 19 d., ketvirtadienis
Windows cannot run disk checking on this volume because it is write protected.
Microsoft Windows [Version 6.1.7601]
Copyright (c) 2009 Microsoft Corporation. All rights reserved.
C:\Users\Axi>chkdsk H: /r
The type of the file system is NTFS.
Windows cannot run disk checking on this volume because it is write protected.
C:\Users\Axi>diskpart
Microsoft DiskPart version 6.1.7601
Copyright (C) 1999-2008 Microsoft Corporation.
On computer: 3IT
DISKPART> list disk
Disk ### Status Size Free Dyn Gpt
-------- ------------- ------- ------- --- ---
Disk 0 Online 931 GB 0 B
Disk 1 Online 372 GB 2048 KB
Disk 2 Online 372 GB 9 MB
Disk 3 Online 931 GB 0 B
DISKPART> select disk 3
Disk 3 is now the selected disk.
DISKPART> attributes
Microsoft DiskPart version 6.1.7601
VOLUME - Manipulate volume attributes.
DISK - Manipulate disk attributes.
DISKPART> attributes disk
Current Read-only State : Yes
Read-only : Yes
Boot Disk : No
Pagefile Disk : No
Hibernation File Disk : No
Crashdump Disk : No
Clustered Disk : No
DISKPART> attributes disk clear readonly
Disk attributes cleared successfully.
DISKPART> attributes disk
Current Read-only State : No
Read-only : No
Boot Disk : No
Pagefile Disk : No
Hibernation File Disk : No
Crashdump Disk : No
Clustered Disk : No
DISKPART>
2015 m. kovo 12 d., ketvirtadienis
Windows tips and tricks
Pressing the Windows key, plus the number of the program you want to open, launches it. For example. Pressing Win + 3 launches the Chrome browser.
Just hold down the Shift button, then open the program as you normally would, either via a left click of the mouse or the aforementioned quick-launch keyboard trick. A new, clean version of the software appears alongside the one you already have open.
To copy a file path to your Clipboard, hold down the Shift key, right-click the file or folder you want, then select the newly revealed "Copy as Path" option. Now you can paste the info wherever you'd like—including the "File name" portion of Browse dialog boxes, with no extra browsing required.
But that's just the tip of the iceberg! Holding down the Shift key as you right-click a file or folder will add an absolute ton of new folder locations to the basic Send to menu.
First, create shortcuts to the folder locations you're like to add to the Send To menu by right-clicking them, then selecting Send to > Desktop (create shortcut). Once that's done, open Windows Explorer, then type shell:sendto in the location bar at the top, followed by Enter. You'll be brought to the location that holds your Send To options; just drag and drop in the shortcuts to the folders you want to add to the tool.
Rather than trying to track that missing file down or manually delete the legion of copies, whip out the universal Get Out of Jail Free card that, somewhat surprisingly, also works within Windows proper: Crtl + Z. The keyboard shortcut undoes your last action, restoring order when chaos suddenly appears. (Crtl + C and Crtl + V for copying and pasting, respectively, also work properly within Windows.)
…unless you add checkboxes to Windows icons, that is. In Windows 7, type Folder options into the Start Menu's search bar. Next, open the "View" tab in the window that appears and ensure the "Use check boxes to select items" checkbox is checked. In Windows 8, just open Windows Explorer, open the "View" tab, and check the "Item check boxes" box in the Show/Hide pane.
One of the most appealing aspects of Windows 8's touch-friendly side is its ability to "Snap" multiple open apps side-by-side, Windows key + left arrow, Windows key + right arrow, and Windows key + up arrow snaps the selected window in the same manner.
The advanced search tools let you add fancy filters, from date and file type to Boolean operands. This Microsoft page offers a full list of such commands in Windows 7. In Windows 8, you'll find similar functionality in the Search Tools section of the File Explorer's Ribbon UI.
You can create a shortcut to a custom search by simply dragging the magnifying-glass icon in the File Explorer location bar to the desired location. Clicking it will always give you up-to-date results.
Right-clicking a taskbar icon brings up that's program's Jump List—quick links to the most recent files you've opened with that program. Got a file or template you open often? Pin it to the Jump List by dragging it onto the program's taskbar icon, or by clicking the pin icon to the right of the file name in the Jump List itself. Jump Lists can skirt around Windows' frustrating refusal to pin individual folders to the taskbar, pinning folders to the Jump List instead.
Right-click on the taskbar, select Properties, then open the Jump List tab in the dialog box that appears. Here, you'll find some basic tools that let you fiddle with how Jump Lists behave—including the number of items you want displayed when you open a Jump List. Set it to the number you desire (more than 15 to 20 gets unwieldy) and click OK to save your changes.
Drag the folder itself onto the Favorites icon in File Explorer's left-hand pane, or navigate to the chosen folder directly, then right-click the Favorites icon and select Add current location to Favorites.
Right-click the program's launch icon and select Properties. Open the Shortcut tab, then click in the "Shortcut key" field and press the key you want to use to launch the program. Windows will assign Ctrl + Alt + <key of your choice> as a keyboard shortcut to open the program. It's a seriously useful trick, especially if you don't want to stuff your taskbar full of quick-launch program icons. Don't forget to click OK when you're done to save the shortcut.
Right-click on your taskbar once again, select Properties, then open the Toolbars tab. A list of Windows' available toolbars appears/ Simply check the box next to ones you want to add to your taskbar and click OK. I like the Address and Desktop toolbars. Address plops a URL bar in your taskbar, which you can use to browse directly to any website in your default browser. Desktop adds a drop-down (drop-up?) menu you can use to browse to any folder or file on your PC. Sweet!
Just right-click the Windows desktop and select New > Folder. Name it GodMode.{ED7BA470-8E54-465E-825C-99712043E01C} —you can actually switch out "GodMode" for any other name, but the period and all the jumble afterwards have to be exact. If you did it right, the folder icon will switch to the Control Panel icon. Start exploring, and dive into this tutorial for even deeper GodMode tricks. (And yes, it works with the Windows 10 Preview too.)
This little-known tool creates an HTML slideshow of your actions, recording your moves step-by-step so that you can show your IT admin or resident PC geek exactly what you're doing when you run into a problem. It's a huge boon during especially tricky troubleshooting situations.
To open the Problem Steps Recorder, simply search for psr in the Windows 7 Start menu or Windows 8's Start screen. The tool should pop right up and is very straightforward to use.
To open the Reliability Monitor, open the Control Panel and head to System and Security > Review your computer's status and resolve issues (under Action Center) > Maintenance > View reliability history (under "Check for solutions to problem reports"). Presto!
Windows can give you a detailed report on your laptop's power efficiency, if you know where to look for it. Search for Command Prompt via the Start menu (Win7) or Start screen (Win8), then right-click on the Command Prompt result and select Run as administrator. Then enter powercfg -energy -output FolderEnergy_Report.html into the Command Prompt, replacing "Folder" with a file path to the folder of your choice.
Head into the Control Panel again, then select Display. You want the Calibrate color option in the left-hand options pane. Diving into the tool is beyond the scope of this article, but you can find full step-by-step details on using Windows' calibration tool in this guide.
http://windows.microsoft.com/en-us/windows/keyboard-shortcuts#keyboard-shortcuts=windows-8
The Pro and Enterprise versions of Windows 8 support Microsoft's Hyper-V virtual machine manager, though you have to install it. Open the Control Panel and head to Programs > Turn Windows Features on or off, then check the Hyper-V box and click OK. Reboot after the install. Check out this guide to learn how to use Hyper-V, or the free VirtualBox tool if you want to run virtual machines on the standard version of Windows 8 (or any previous version of Windows).
The User Account Control baked into Windows 7, 8, and Vista—the box that pops up asking you express permission to allow certain programs and processes to run—is ostensibly there to protect everyday users from security threats, but it's more annoyance than assistance for seasoned users. Tweak its settings or turn it off completely by heading to Control Panel > User Accounts and Family Safety > User Accounts > Change User Account Control Settings. You'll be glad you did. (Or Start -> "uac"
Windows 8 may have killed the Start menu, but it didn't leave power users wanting completely: Right-clicking in the lower-left corner of the operating system, whether you're on the desktop or the Live Tile'd Start screen, reveals a long menu technically dubbed the Quick Access Menu, but I call it the power user's delight.
The Quick Access Menu provides—you guessed it—quick access to a slew of helpful power tools, including the Command Prompt, Network Connections, Device Manager, Event Viewer, and the Computer Management interface. Don't miss this easy-to-overlook gem.
Windows 8 and 8.1 shook up Microsoft's classic OS, but it removed some helpful legacy desktop options—most notably, the Start menu and, in Windows 8.1, Library quick-links in File Explorer.
Microsoft plans to bring the Start menu back to Windows 8, but for now, you'll have to resort to using a third-party Start menu replacement tool if you miss your menu. Returning Libraries to Windows 8.1 is easier. Just open File Explorer, then head to View > Navigation pane and select View Libraries. Microsoft ripped some other features out of Windows 8.1, too, which you can read all about here. (Bonus: Windows 8.1 now includes Library support for removable media like flash drives and SD cards.)
http://www.pcworld.com/article/2598481/15-simple-secret-windows-tips-and-tricks-designed-to-save-you-time.html#slide13
2014 m. gruodžio 3 d., trečiadienis
Embed facebook into website [gallery]
http://www.digitaltrends.com/social-media/how-to-embed-facebook-photo-albums/
Trumpai:
http://embedsocial.com/embed-gallery.php
Add this code in your head tags (if it's not there):
<script src='https://ajax.googleapis.com/ajax/libs/jquery/1.7.1/jquery.min.js'></script>
Toje vietoje, kur nori nuotraukų įdėti:<div id="photos"></div>
<iframe src="http://embedsocial.com/facebook_album/album_photos/518749254881783" width="900" height="1450" frameborder="0" scrolling="no" marginheight="0" marginwidth="0"></iframe>
Vietoje "518749254881783" įrašyti albumo numerį, pvz.:
https://www.facebook.com/media/set/?set=a.880352275375120.1073741843.760533574023658&type=1
Albumo numeris yra: 880352275375120
2014 m. lapkričio 27 d., ketvirtadienis
Windows XP mode
http://windows.microsoft.com/en-us/windows7/install-and-use-windows-xp-mode-in-windows-7
Windows Virtual PC is the latest Microsoft virtualization technology. You can use it to run more than one operating system at the same time on one computer, and to run many productivity applications on a virtual Windows environment, with a single click, directly from a computer running Windows 7.
- Make sure you're running Windows 7 Professional, Enterprise, or Ultimate. To find out which edition of Windows 7 you're running, click the Start button , right-click Computer, and then click Properties.
- Find out whether your computer's CPU is capable of hardware-assisted virtualization. To check, download and run theHardware-Assisted Virtualization Detection Tool.
- If you receive the message “This computer is configured with hardware-assisted virtualization,” you can run Windows Virtual PC and Windows XP Mode. See the instructions below.
- If you receive the error message "There is no hardware-assisted virtualization support in the system," your computer's CPU doesn't support hardware-assisted virtualization. You can still use Windows XP Mode by installing an update to Windows 7. See Why am I receiving errors about hardware-assisted virtualization (HAV) when I try to use Windows XP Mode and Windows Virtual PC?. Be aware that XP Mode will run much better if hardware-assisted virtualization can be enabled.
- If you receive an error message saying "Hardware-assisted virtualization is disabled," this means your computer supports hardware-assisted virtualization, but you need to change settings in your computer's basic input/output system (BIOS) to turn on hardware-assisted virtualization. Procedures to turn on virtualization settings in your computer's BIOS vary depending on the BIOS manufacturer. Check the information that came with your computer or go to the computer manufacturer's website.
- Go to the Windows XP Mode page in Download Center.
- Under Quick Details, select your language.
- Click Continue and follow the instructions on the screen to validate your copy of Windows 7.
- Select a version of Windows XP Mode to install and click Install.Note: Windows XPMode_N versions don't include Windows Media Player.
- Click Run in your browser's message bar, and follow the instructions on the screen.
- When setup is completed, click Finish.
- Go to the Windows Virtual PC page in Download Center
- Under Quick Details, select your language.
- Click Continue and follow the instructions on the screen to validate your copy of Windows 7.
- Select a version of Windows Virtual PC to install and click Install.
- Note: The x64 version works with 64-bit versions of Windows 7. The x86 version works with 32-bit versions of Windows 7. To find out if your PC is running 32- or 64-bit Windows 7, click the Start button , right-click Computer, and then click Properties. 32-bit and 64-bit information appears next to System type.
- Click Run in your browser's message bar, and follow the instructions on the screen.
- Click Yes to install Update for Windows (KB958559).
- If you accept the license terms, click I Accept.
- After installation is complete, click Restart Now to restart your computer.
2014 m. lapkričio 12 d., trečiadienis
Protected Excel files remove
Jei nori pašalinti apsaugą nuo tokio dokumento, kaip šis:
http://www.straxx.com/free-excel-password-remover-2012/
Užsisakykite:
Pranešimai (Atom)